Star-hopping tutorial 3: Star-skipping to M11
 This the third in a series of tutorials intended to develop basic star-hopping skills. The focus of these tutorials is not on finding particular deep sky objects, but rather on using hops to selected objects as a vehicle for illustrating star-hopping techniques.
This lesson introduces star-skipping—a way to skip across large areas either to speed up a long-range star-hop or to get across areas that lack stars suitable for traditional star-to-star star-hopping. The star-hop from Altair to M11 provides a perfect example of where this technique can be useful. Altair itself is bright enough to be visible even in heavily light-polluted skies. But light pollution combined with summer haze and M11's somewhat low position on the horizon often leaves few other stars visible for star-to-star hopping. The best way to get from Altair to M11 is to “skip across” such barren areas to the brighter stars...
Other tutorials in the series: Lesson 1, Lesson 2
Prerequisites
As in previous lessons, there are three general prerequisites to these lessons:
- I assume you know your way visually around the major constellations and the brightest stars. In particular, for this lesson I assume you can find Altair (α Aql).
- You need a star atlas going down to at least 6th magnitude (I recommend S&T’s Pocket Sky Atlas).
- You need a finder-scope or binoculars.
In addition, you should be comfortable with basic star-to-star star-hopping techniques such as those illustrated in tutorial 1 and tutorial 2.
Step 1: Plan the Star-hop
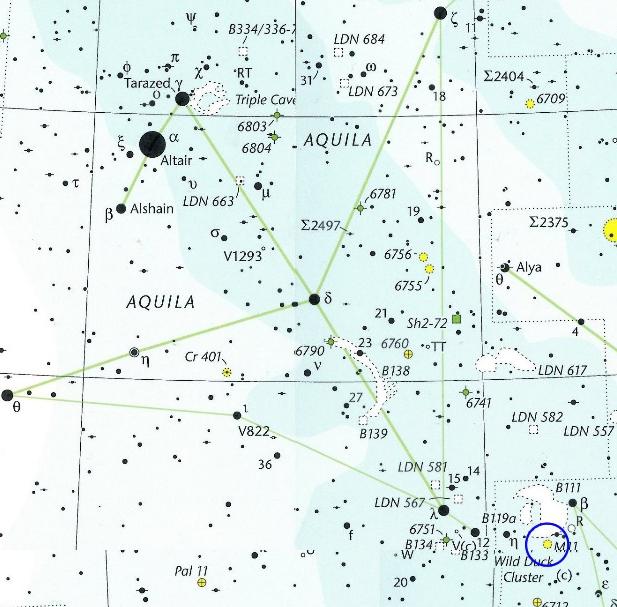
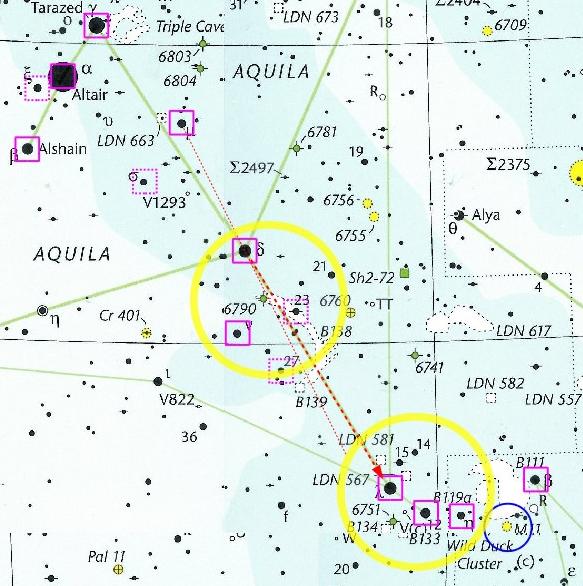
Looking at M11 in your star atlas, you can see that Altair is a natural starting point for this star-hop (see the figure below, M11 is circled in blue).
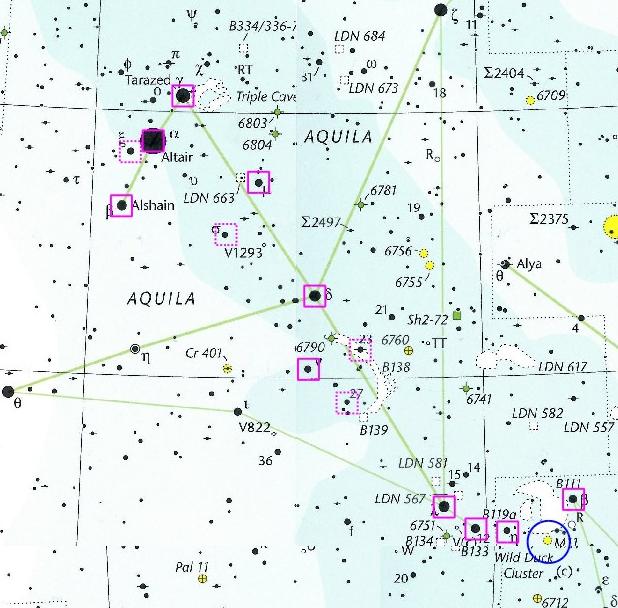
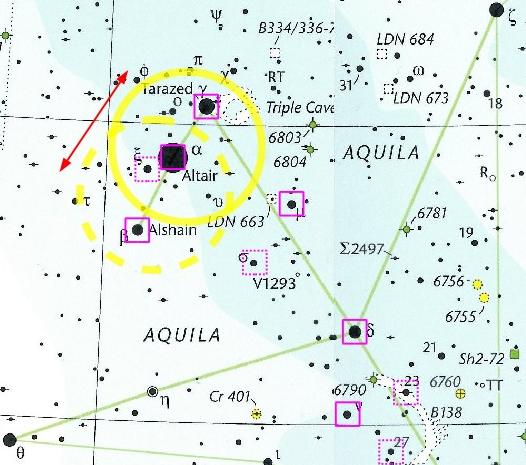
However, it is a relatively long way from Altair to M11. Furthermore, the somewhat low position of Aquila and Scutum above the horizon and heavy summer hazy means that few other stars are visible south of Altair. In fact, from the heavily light polluted Washington DC area, few stars are easily visible even with a modest finder-scope. Just the other night, only α, β, and γ Aql were naked-eye visible and the stars boxed in magenta in the figure below were the only ones readily visible in my 8x50 finder-scope (the stars boxed with dashed-lines were visible in my finder only using averted-vision, making them of dubious value for star-hopping). The stars marked with solid magenta boxes are the ones we'll rely on for our star-hop.
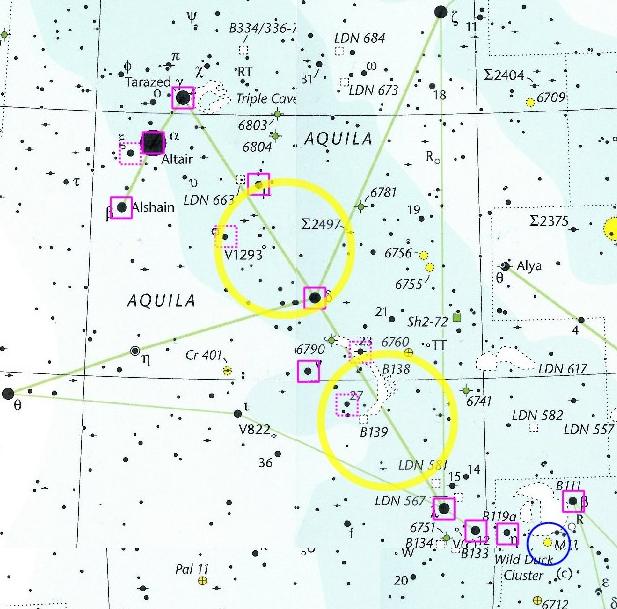
Note also that there is a notable gap between ν and λ Aql that is devoid of stars useful for star-hopping. This is highlighted in the chart below by the yellow ring illustrating a typical 5 degree finder field-of-view. A smaller gap between μ and δ Aql is also highlighted with a yellow finder ring.
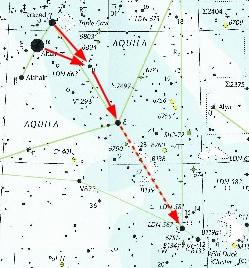
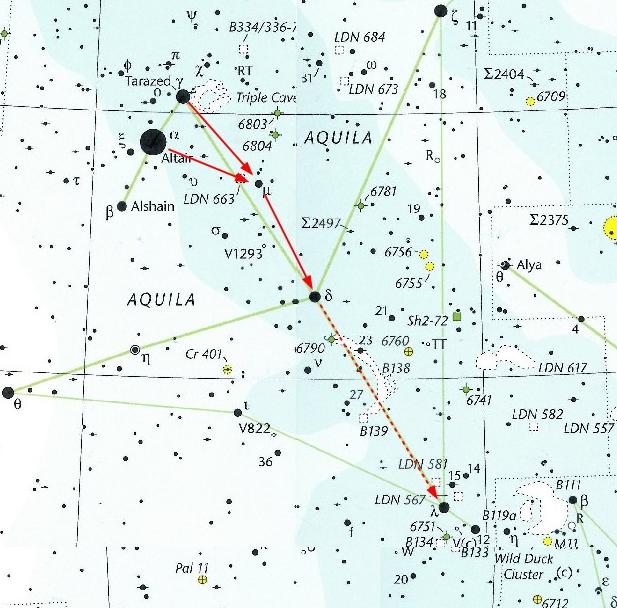
What we'll do is start with Altair and γ Aql, and then proceed to μ Aql. From μ Aql we'll do a little skip straight to δ Aql. From δ Aql we'll do a big star-skip to λ Aql. This is illustrated in the following figure.
Step 2: Confirm your location and orientation
After pointing at Altair, we need to confirm our location and orientation. To do this, scan on either side of Altair, going back and forth between β and γ Aql. The β-α-γ alignment confirms you are looking at Altair, but the key point is to confirm which of the stars is γ Aql. If you can see ξ Aql or perhaps ο Aql (or even υ Aql), you can easily pick out which of the two stars on either side of Altair is γ Aql (see the figure below). It is possible that the summer haze combined with the light-pollution won't let you see any of these stars. In that case, pay close attention to which way the telescope is moving as you sweep back and forth between the two stars on either side of Altair. One of the two will be more “up” and/or to the “right” (at least for northern observers; more correctly, one will be more north and west of the other)—that one is γ Aql.
We also need to confirm the direction towards M11 (to the south and west of Altair). If you can see ξ Aql, we'll be heading in the opposite direction. If you can't see it, we'll confirm we are going in the right direction as part of the next step.
Step 3: From Altair and γ Aql to μ Aql
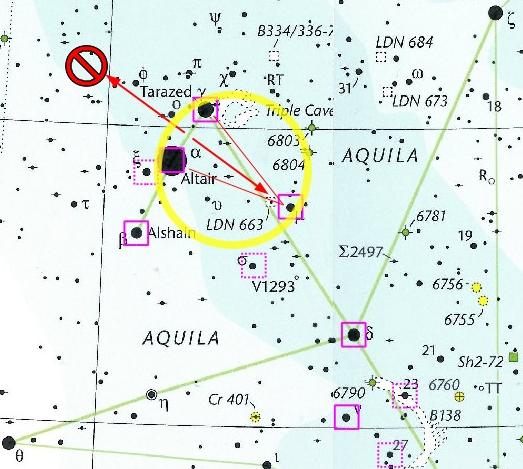
Center your finder half-way between Altair and γ Aql (both should fit comfortably in your finder's field of view). μ Aql forms a roughly equilateral triangle with Altair and γ Aql at the base. This triangle just barely fits within a 5 degree field of view, as shown in the figure below. To get to μ Aql simply move perpendicularly away from the line between Altair and γ Aql. As you do this, roughly at about the time that Altair and γ Aql exit the field of view, μ Aql should enter on the opposite side. In fact, if μ Aql doesn't enter the field of view pretty soon after Altair and γ Aql depart, there is a good chance you are going the wrong way (note the lack of brighter stars if you go the wrong way). To make sure you are going the right way, confirm that your telescope is moving “down” and/or “right” as you make the hop to μ Aql (again, northern observers only; more correctly, be sure you are moving south and/or west). If you are moving correctly, μ Aql will pop right into your field of view.
Step 4: From μ Aql to δ Aql
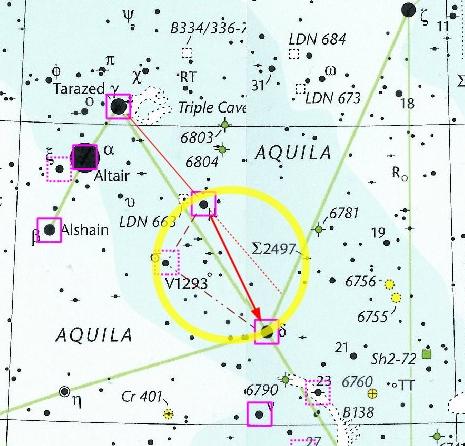
Getting from μ Aql to δ Aql involves a “skip” across a gap slightly wider than the typical 5 degree finder field-of-view. To properly aim your skip, note that direction from μ Aql to δ Aql is almost the same as the direction from γ Aql to μ Aql—but not quite. As shown in the figure below, you actually need to steer about 30 degrees southward from where the line from γ Aql to μ Aql points. “Southward” means “towards the same side of the line between γ Aql to μ Aql that Altair is on”. You don't need to get the angle quite right; in fact if you go straight along the line extending from γ Aql to μ Aql, you'll still see μ Aql enter the finder field-of-view, just sort of on the south-western side.
Alternately, if you can see σ Aql while you are centered on μ Aql, then you can use the fact that μ-σ-δ Aql form a triangle with an approximate right-angle at σ Aql (see the darker dashed lines in the figure above). You can use that to go from μ to σ to δ.
Step 5: From δ Aql to λ Aql (the big skip)
To make the big skip, you need to get the direction about right. As shown in the figure below, the extension of the line connecting μ Aql to δ Aql will pretty much get you dead-on to λ Aql. While you may be able to see ν Aql to the south of δ Aql, it won't help you much in getting the direction right. I find the best way to execute the big skip is to backup to μ Aql and practice going back and forth between μ Aql and δ Aql in a straight, steady motion. When you can do that smoothly, do it again but this time keep going past δ Aql. The distance from δ Aql to λ Aql is approximately twice as far as the distance between μ Aql and δ Aql. Practicing going back and forth between μ Aql and δ Aql in a smooth, steady motion will give you a good feel for going “twice as far.”
You'll know you've arrived at λ Aql because of the distinctive “swoosh” pattern formed by λ Aql, 12 Aql, and η Sct (all three should be clearly visible in your finder). If you don't clearly see the swoosh pattern, you are not at λ Aql (you might be at β Sct or, less likely, at f Aql). In that case, go back to Altair, find your way back to δ Aql (make sure it is δ Aql by checking for ν Aql to the south) and then spend some more time practicing going back and forth between μ Aql and δ Aql in a smooth, straight motion. Progressively go past δ Aql a little further on each back and forth cycle (but go back all the way to μ Aql each time), Make sure you stay as straight as you can each time. Eventually you'll get far enough past δ Aql to see λ Aql.
Step 6: From λ Aql to M11
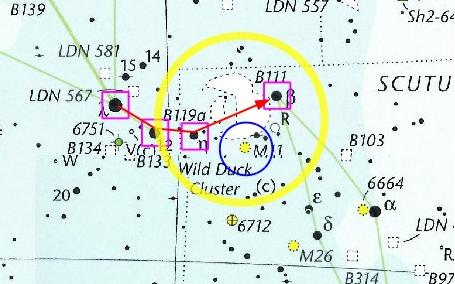
From λ Aql follow the swoosh through 12 Aql and η Sct to β Sct, pausing when you have both η Sct and β Sct in the same field-of-view, as shown in the figure below. Try to center your finder about half-way between η Sct and β Sct.
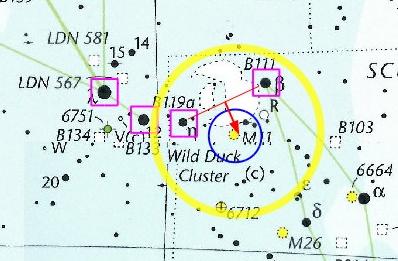
Then from that mid-point between η Sct and β Sct move perpendicularly downward (as shown in the next figure below). “Downward” in this case means “towards the opposite side of the line than the side λ Aql is on” (as confirmation, your telescope should be moving roughly towards the south as you make this move). You don't need to go far: you should move no more than half the distance between η Sct and β Sct. The faint pair of stars to the immediate northeast of M11 (the ones inside the blue circle around M11 in the figure)—if visible—show you how far to go. At this point you might be able to see M11 as a faint smudge in your finder-scope. If not, pop-in a low-power eyepiece into your telescope, and you should be rewarded with a nice view of M11.
If not (and I would be surprised if you don't immediately see M11), first confirm through the finder-scope that you are indeed halfway between η and β Sct and little below the line connecting them. Also confirm that you indeed looking at η and β Sct by backing up and confirming you see the swoosh pattern of λ Aql, 12 Aql, and η Sct. If you are in the right place, then make sure when you point to M11 that you are not on the wrong side of the line between η Sct and β Sct—if you keep going past M11, δ Sct should enter the finder field-of-view about the same time that η and β Sct exit on the other side. Now point at M11 as before and try looking through your telescope again. Note the star-field you see through the main telescope and very gently sweep left, right, up, and down, always going only a little bit in one direction and then back-tracking to return to your original star-field. You shouldn’t have to go more than one eyepiece field-of-view away. Always sweep away from your starting spot very carefully, return each time to where you started. Otherwise, you’ll soon wander far away and you’ll have to re-start the star-hop. You might also try a slightly higher power eyepiece (60x to 90x) because M11 is a bit small and perhaps that is why you missed it.
Closing Thoughts
Star-skipping relies on two factors, one which is under your control, and one which isn't. The one under your control is learning to make straight sweeps of 10 to 20 degrees with your telescope while looking through the finder-scope. With a bit of practice it is actually easy to master this skill. The second factor—which is not under your control—is that you need to have a distinctive star pattern to “land” your sweep. Without a such a pattern to catch your eye, you can easily sweep completely past your destination. In this example, the λ Aql, 12 Aql, and η Sct “swoosh” provided exactly such a pattern. At first, the patterns will need to stand-out clearly (as the “swoosh” did; a solitary bright star can be equally effective), but as you get more experience, you'll be able to land more subtle patterns. Star-skipping is also useful as a way to speed up star-hopping. For example, in my heavily light-polluted skies, I routinely get to western Pisces (the “Pentagon”) and to eastern Aquarius by star-skipping in big sweeps from Markab (α Peg).
Homework
Assignment #1: Practice star-skipping in one continuous sweep from Sadr (γ Cyg) to Albireo (β Cyg) and back. In either direction, the way to land your sweep is “stop at the second bright star” (in either direction, η Cyg counts as the first bright star).
Assignment #2: Star-skip from Vega to Eltanin (γ Dra). Eltanin is the only bright star in that direction and the head of Draco (formed by γ, β, ν, and ξ Dra) provides your confirmation that you are in the right place. The line from Sheliak (β Lyr) to Vega gives you the right direction for your star-skip.
Assignment #3: Star-skip from Sirius to β Mon. The line from π CMa (or farther away σ2 CMa) to Sirius gives you the direction. β Mon is the first “brighter” star beyond Sirius in that direction, but there are plenty of slightly fainter stars along the way (don't stop at those). Nearby γ Mon provides confirmation you made it to β Mon. Stop and look at β Mon through your telescope: it is a particularly pretty triple star.
Extra Credit #1: Star-skip from Markab (α Peg) to the Pisces “Pentagon” (formed by θ, γ, κ, λ, and ι Psc). This one is a bit harder because the Pentagon probably doesn't all fit within your finder field-of-view, and none of the individual stars that make up the Pentagon are particularly bright. It is also hard because you'll have to guess-timate the direction of your sweep as you launch from Markab. I suggest sweeping first between Markab and ξ and ς Peg to get a sense for baseline between them, then from about mid-way between Markab and ς Peg launch your sweep perpendicularly to that baseline.
Extra Credit #2: Star-skip from γ Psc (western tip of the Pisces “Pentagon”) to ψ Aqr. The triple star-pattern formed by ψ1, ψ2, and ψ3 Aqr provides a distinctive landing pattern. The challenge is aiming your sweep in the correct direction as you launch from γ Psc: the line connecting θ and κ Psc is about the right direction.
Comments
Extension of the skipping technique.
With our washed out skies, when the skipping involves long distances I sometimes use what I call the cross hairs technique. I find two pairs of visible stars that define two great circle segments where the intersection of the segments is very near the dim object I'm trying to visit. I practice "skipping" between two of the stars to make sure I can follow the segment, then stop a scan around the intersection. If appropriate I search near the intersection for dim patterns of stars that I recognize from a star chart.
One example is M2. It is near the intersection of the great circle segments formed by Theta Aql to Alpha Aqr, and Epsilon Peg to Beta Aqr. To find M2 I didn't need or notice a particular patern, I just scanned south from Enif (Epsilon Peg) and slowed down when I got near the intersection spot.
Another example target is SS Vir. This dim red variable star is near the intersection between Beta Leo to Alpha Vir and epsilon Vir to Eta Vir. The night I first spotted this star, the light pollution was so bad that I couldn't really pick out Eta Vir at first. The segment from Denebola to Spica lies to the North of SS Vir. There is a better cross hair formed by using Nu Vir and Gamma Vir instead of Denebola and Spica. Gamma Vir is more often visible but Nu Vir isn't. However Gamma Vir and Eta Vir have fainter stars near them which form a distinctive pattern visible in binoculars. Each has a dimmer star on the side AWAY from SS Vir. With such poor sky I was able to scan from Denebola toward Spica, when I got to the right region I looked for the distinctive pattern to the south of the scan line. After recognizing the pattern, the search for the object becomes a regular very short star hop.
You can see that in practice I scan or "Skip" down one segment and visually use the other segment as a guide to tell me when I'd gone too far. If one segment doesn't work for the scan, I try the other. You can also see that I scan along the many degrees of sky that sometimes separate the few visible stars in the DC area.